Creating auto commit to the Github
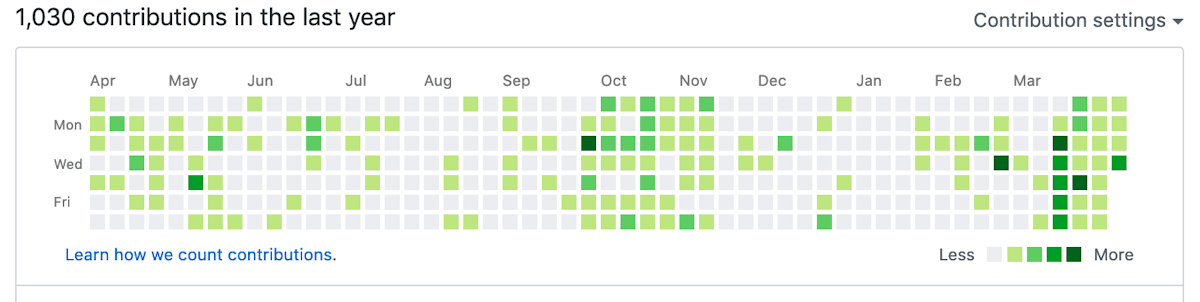
Long time not creating any commit for me because of my daily jobs using different Github account with my personal account @mazipan, this is for separating my activity for my professional job and my hobbies. This situation make my “Green” activity in my main account become white 😂
When first time knowing Github Actions, I already fall in love in the first sight with this feature. Finally, I can create my CI/CD without leaving the platform. Before Github Actions, I used third party service for maintaining my CI/CD, mostly on Travis CI, but I also exploring Circle CI in short time. I need to move from Github to Travis to see the logs and status of my CI/CD job. Maybe not a big thing for you, but for me it’s quite wasting my time. Github Actions, come to solve this problem. I also believe that Github Actions will have seamless integration with the Github Platform since the already know their own platform.
Yash, after exploring the Documentation and playing around in my open source repository I feel very helpful with this tools. Very handy, simple script, and works very well with the Github itself.
Back to my problem, I have idea to automatically create a commit in any repository to make Github recognize as an activity and mark a green square in my profile. This problem is quite same with one of my use case in the homepage repository in Vue.js Indonesia organization that I helped to maintained, they use two repository, one for source of development and the other one is for generated code by VuePress. Now I have two cases that need to be solved, so I must read more about the Github Actions, how it can solve my problem.
Get started with Github Actions
Configuration file for Github Actions is using Yaml and placed in the directory .github/workflows. In this folder we can create multiple file Yaml which is good for separating a job with different trigger or split some task to achieve better readability.
For my case, I will create configuration file named .github/workflows/autocommit.yml. First thing we will add in this file is field name so we can read the status easier based on the name we type in here. You can see this code to know how we adding a name in our Yaml:
name: Auto commit
Trigger
Trigger is a common thing in CI. Basically it’s define the time when the job should be triggered and which job should be triggered. Github Actions coming with easy syntax to define the trigger. Some of them is very similar with Github Web Hook if we already learn about before. Even you haven’t read or play with Web Hook, it still easy to you to understand from the Documentation. You can read in “Events that trigger workflows”.
We will create our first trigger with this code:
name: Auto commit
on:
  push:
    branches:
      - master
You can see the code above, we just adding on which represent the trigger block, we adding push which we want to command the Github Actions to listen the push event to any branch. For that we define master as a branch that we listen about.
We already create our first trigger on Github Actions, but this is can not solve our problem.
Our case need some scheduler that run automatically and doing a commit activity.
And yay, Github Actions also coming with programmatically scheduler.
We can use Cron string to define our scheduler time, if you are not familiar with Cron string, I suggest you to read about it or you can jump to crontab.guru to generate your own Cron string without need to memorize all the syntax. This below code show you how to define scheduler that run in every 7 morning.
name: Auto commit
on:
  push:
    branches:
      - master
  schedule:
    - cron: '0 7 * * *'
Adding job on Github Actions
After the trigger is meet requirements, CI will execute some job we already create. This is the main part of our CI code.
Let’s see this simple code to understand about the job:
name: Auto commit
on:
  push:
    branches:
      - master
  schedule:
    - cron: '0 7 * * *'
jobs:
  auto_commit:
    runs-on: ubuntu-latest
    steps:
      - name: Test the jobs
        run: |
          echo "just another test"
We create our first job after type job to start the job block.
After that we adding auto_commit as our job name. One workflow can contain more than one job, that’s why we need to give it a unique name for identifier.
Inside an auto_commit block, we start to define the operation system we want.
I choose the latest Ubuntu to running this job, so I add runs-on with single value ubuntu-latest.
Github Actions have capability to define multiple operation system to run one job.
After define the OS, we can start our job inside steps block.
Every block inside steps means the serial step that need to be run by the Github Actions according the order.
We just add our simple echo to test our script is executed or not.
From this step, you can commit and push the changes to the master branch and we can goes to Actions tab in the Github Web to inspect our job. The job along with all details and logs should be shown on the Github Web. You can explore the UI to get more familiar with Github Actions.
Checkout the git
We will start with real syntax to solve our problem. We will start with checkout the Git repository where we run the Actions. Github Actions is coming with good design, they allow everyone to create their own Actions and share with the other users. This is like the Dependency Manager use on the programming language environment. We just need to put any 3rd party scripts along with their version to use it in our code.
You can see this sample code to checkout the Git repository:
name: Auto commit
on:
  push:
    branches:
      - master
  schedule:
    - cron: '0 7,8,9,10,11 * * *'
jobs:
  auto_commit:
    runs-on: ubuntu-latest
    steps:
      - uses: actions/checkout@v2
        with:
          persist-credentials: false
          fetch-depth: 0
We add uses and using Actions from actions/checkout which is official Actions to checkout the Git repository.
I adding two arguments or parameters inside with block.
This is because the Actions we used for commit back have an issue and need to adding these two param to make it work.
Create a changes
To make sure the auto commit job is working well, we need to make sure that we always have a file changes in the Git so commit and push command can be executed correctly without any errors.
I create a cheat by creating file LAST_UPDATED that always updating the content with the latest timestamp.
You can see this code:
name: Auto commit
on:
  push:
    branches:
      - master
  schedule:
    - cron: '0 7,8,9,10,11 * * *'
jobs:
  auto_commit:
    runs-on: ubuntu-latest
    steps:
      - uses: actions/checkout@v2
        with:
          persist-credentials: false
          fetch-depth: 0
      - name: Modify LAST_UPDATED file
        run: |
          d=`date '+%Y-%m-%dT%H:%M:%SZ'`
          echo $d > LAST_UPDATED
Commit dan push back
In our local, we usually use this flow to push to the Git:
git add -A, staged all changesgit commit -m "some message", commit to local Git with a messagegit push origin master, push to the origin.
For Github Actions, basically we run same steps. Just note that in the Github Actions we doesn’t have a global git configuration so we need to set it in our step. We also need to use ad-m/github-push-action to push back to our repository.
This code will show you how to commit a changes to the Git with a message and configuration that we set:
name: Auto commit
on:
  push:
    branches:
      - master
  schedule:
    - cron: '0 7,8,9,10,11 * * *'
jobs:
  auto_commit:
    runs-on: ubuntu-latest
    steps:
      - uses: actions/checkout@v2
        with:
          persist-credentials: false
          fetch-depth: 0
      - name: Modify LAST_UPDATED file
        run: |
          d=`date '+%Y-%m-%dT%H:%M:%SZ'`
          echo $d > LAST_UPDATED
      - name: Commit changes
        run: |
          git config --local user.email "{YOUR_EMAIL}"
          git config --local user.name "{YOUR_USERNAME}"
          git add -A
          git commit -m "Some message"
This code show you how to push back to the repo:
name: Auto commit
on:
  push:
    branches:
      - master
  schedule:
    - cron: '0 7,8,9,10,11 * * *'
jobs:
  auto_commit:
    runs-on: ubuntu-latest
    steps:
      - uses: actions/checkout@v2
        with:
          persist-credentials: false
          fetch-depth: 0
      - name: Modify LAST_UPDATED file
        run: |
          d=`date '+%Y-%m-%dT%H:%M:%SZ'`
          echo $d > LAST_UPDATED
      - name: Commit changes
        run: |
          git config --local user.email "{YOUR_EMAIL}"
          git config --local user.name "{YOUR_USERNAME}"
          git add -A
          git commit -m "Some message"
      - name: Push Back
        uses: ad-m/github-push-action@v0.5.0
        with:
          force: true
          directory: '.'
          github_token: ${{ secrets.GITHUB_TOKEN }}
We use the Actions from ad-m/github-push-action@v0.5.0 and adding 3 parameters,
force to doing a force push,
and the parameter directory with . value which means all changes will be commit back to the repo,
and github_token is a token provided to doing a push. We use value secrets.GITHUB_TOKEN which is provided by Github Actions so we don’t need to add our own personal token.
When you use this Actions, you need to read this issue #44 in ad-m/github-push-action which answered by the creator.
The result
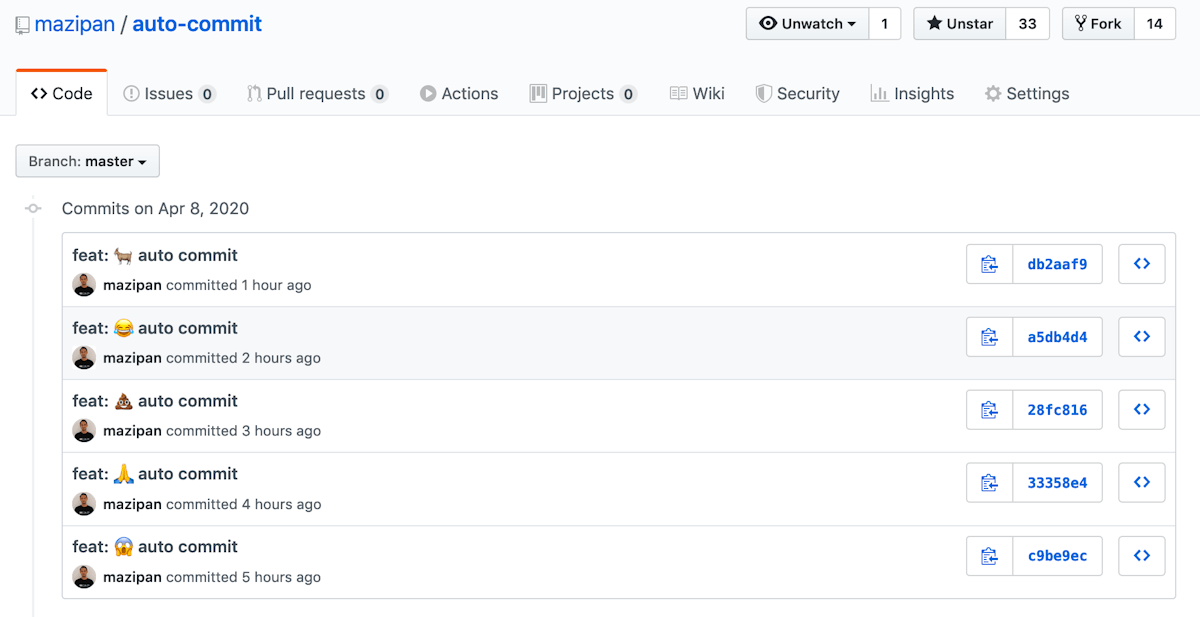
You can change your own scheduler more than one per day, just change the Cron string.